
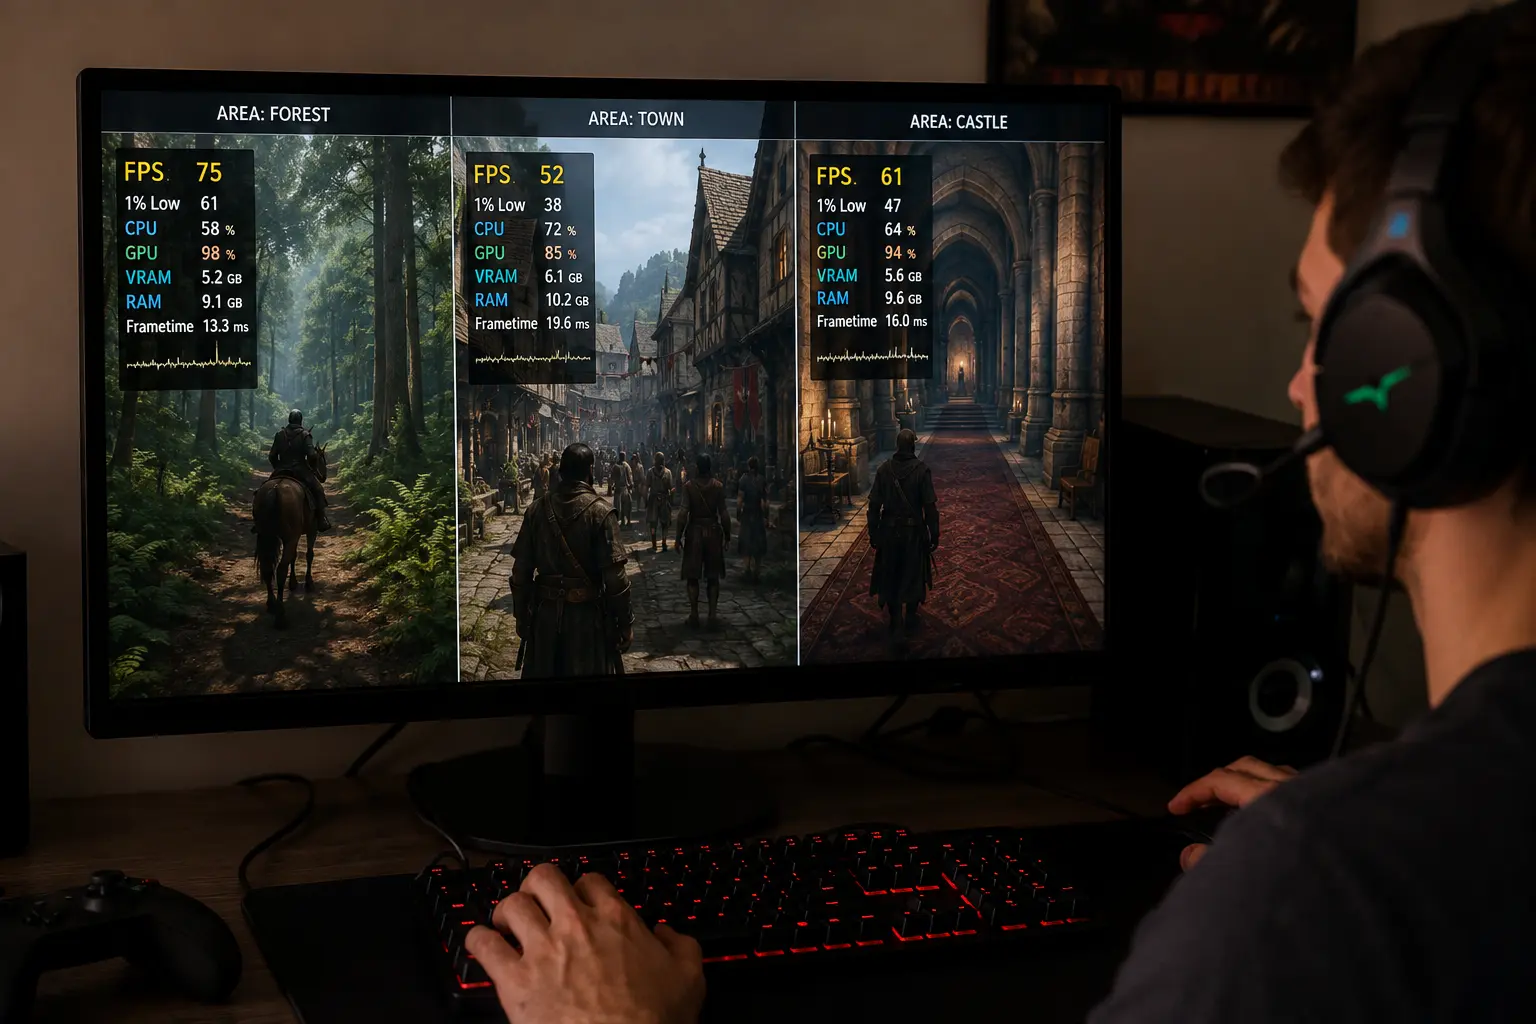
A game can run smoothly in one area and feel noticeably worse somewhere else, even when the graphics settings, resolution, and frame-rate limit have not changed. This often leads players to blame inconsistent optimization, a sudden hardware limitation, or a background process without first checking whether the game is simply placing a different load on the system. Large open areas, crowded locations, indoor rooms, combat sequences, and sections with heavy effects can all stress different parts of a computer.
Looking at performance across several areas of the same game provides much more useful information than recording one average FPS number. A short test in a quiet location may make a game appear perfectly stable while a busy section exposes CPU limitations, shader stutter, VRAM pressure, streaming problems, or frame-time spikes. A simple repeatable comparison can therefore help identify where performance changes and provide clues about what is causing the change.
One Area Is Rarely Enough to Judge Game Performance
A common performance test involves standing in one location, recording the FPS for a minute, and comparing the result after changing a setting. The problem is that this test only describes what happens under those particular conditions. If the location has few characters, limited background activity, and little asset streaming, the hardware may experience a different workload than elsewhere in the game.
A better approach is to choose several areas that naturally represent different workloads. A quiet interior might show how the game behaves with limited world activity, while a crowded settlement can place considerably more work on the processor. A large outdoor area may increase rendering and asset-streaming demands, while combat with numerous effects can create short but important GPU or CPU spikes.
This does not mean every area needs to be measured for a long period. What matters more is consistency. If the same locations can be tested under similar conditions, their results become useful reference points. You can then see whether a performance problem follows a particular type of scene rather than simply appearing randomly.
Choose Locations That Stress Different Parts of the System
The most useful test locations are not necessarily the most visually impressive ones. Instead, look for places that behave differently from one another. A good set might include a quiet indoor location, a busy area with many NPCs, an open outdoor scene, and a demanding combat or effects-heavy section.
NPC-heavy areas are particularly useful when investigating CPU-related limitations. Many characters can require additional simulation, animation, pathfinding, and other game-side processing. If GPU utilization falls while frame rates decline in these locations, the processor or game engine may deserve closer attention.
Open environments can provide different information. They may involve long-distance rendering, vegetation, shadows, geometry, texture streaming, and other GPU-heavy workloads. If GPU usage rises substantially while frame times remain relatively consistent, the performance change may simply reflect the increased rendering workload rather than a fault.
Keep the Test Conditions Consistent
Comparisons become much less useful when several variables change between tests. If you test one location during the afternoon and another at night, for example, differences in lighting or world activity may affect the result. Weather, NPC populations, scripted events, and camera direction can also change the workload.
Try to use the same graphics settings, resolution, upscaling mode, frame-rate limit, and driver version throughout the comparison. If the game has options that change dynamically, such as automatic resolution scaling, record whether they are enabled. Otherwise, a change in image quality may be mistaken for a change in hardware performance.
It is also useful to record the same information at each location. Average FPS can provide a quick overview, but 1% low performance and frame-time behavior often reveal differences that an average hides. GPU utilization, CPU utilization, VRAM usage, system memory usage, and temperatures can provide additional context when something unusual appears.
Repeat the Same Route Instead of Relying on Random Movement
Walking around freely and judging whether the game feels slower is useful for noticing a problem, but it is difficult to reproduce. A repeatable route is much better for comparison. Choose a short path that passes through the area and follow it in approximately the same way each time.
For example, you might start at a particular doorway, walk toward a landmark, turn around, and return to the starting point. In an outdoor game, you could follow the same road or path while maintaining a similar camera direction and movement speed. In combat, a repeatable encounter can be used if the game reliably creates the same conditions.
The goal is not laboratory-level precision. Small differences are unavoidable in many games. The purpose is to reduce unnecessary variation so that a noticeable performance difference has a better chance of representing a real change rather than a completely different scene.
Compare Frame-Time Behavior Alongside FPS
Two locations can both report 60 FPS while feeling very different. The reason is that FPS is an average representation of frame delivery, whereas frame time shows how long individual frames actually take to render.
At 60 FPS, a frame ideally takes about 16.7 milliseconds. If most frames remain close to that value, movement should generally feel consistent. If occasional frames suddenly take much longer, however, the game may produce visible hitching even though the average FPS remains close to 60.
This makes frame-time graphs particularly valuable when comparing different parts of a game. One area might maintain a relatively flat graph while another produces frequent spikes during camera movement or when entering a new section. That pattern can point toward streaming, shader compilation, CPU workload, or another localized issue that a simple FPS counter would not explain.
Watch What the GPU Is Doing When Performance Drops
GPU utilization can help distinguish between a graphics workload and a limitation elsewhere. Suppose one area runs at 90 FPS with the GPU close to full utilization, while another falls to 55 FPS and GPU utilization drops significantly. The lower frame rate does not automatically mean the graphics card has suddenly become too weak.
Instead, something else may be preventing the GPU from receiving work quickly enough. The CPU could be reaching a limit, the game engine could be struggling with simulation, or another process could be interfering with frame production. Looking at GPU usage alongside frame time provides much more information than the FPS number alone.
On the other hand, if a demanding area keeps the GPU near full utilization while frame times increase smoothly, the explanation may be much simpler. The scene is asking the graphics card to do more work. In that situation, reducing a GPU-heavy setting may produce a measurable improvement, whereas changing unrelated CPU settings may accomplish very little.
CPU Usage Needs More Careful Interpretation
A game does not necessarily need to show 100% total CPU usage before the processor becomes a limitation. Modern games can distribute work unevenly across CPU threads, meaning one or a few busy threads can become a bottleneck while the overall CPU percentage still appears moderate.
This is why comparing individual CPU-core or thread activity can sometimes be useful when a particular area causes a large performance drop. If the same busy location repeatedly produces lower frame rates while one CPU thread remains heavily loaded, that provides stronger evidence than simply seeing overall CPU usage at 60 or 70 percent.
The comparison becomes even more useful when GPU utilization falls at the same time. A CPU-side limitation can prevent the graphics card from being fully utilized, creating the confusing situation where a game runs slower even though the GPU appears to have unused capacity.
Check Whether VRAM or System Memory Changes With the Area
Different sections of a game can also place different demands on memory. A location with many high-resolution textures, detailed geometry, or additional assets may consume more VRAM than a simple indoor room.
If performance deteriorates after entering certain areas and VRAM usage approaches the available capacity, memory pressure becomes worth investigating. However, high VRAM usage by itself is not proof of a problem. Games often use available VRAM for caching, and a high reported number can be normal.
Look for a relationship between memory usage and actual behavior. If entering a particular area consistently produces texture loading problems, severe stutters, or large frame-time spikes while memory usage also changes substantially, the two observations become more meaningful together.
Separate Area-Specific Problems From General Performance Problems
This is one of the biggest advantages of testing multiple locations. If every area performs about 15 percent worse after a driver change, the cause is probably not specific to one section of the game. The driver, settings, power configuration, or another system-wide factor may deserve attention.
If only one type of location changes dramatically, the investigation should move in a different direction. A busy city becoming slower could point toward CPU or simulation workload. Stutters when entering previously unseen areas may suggest asset streaming or shader-related activity. A consistent slowdown during effects-heavy combat could indicate increased GPU load.
This distinction prevents unnecessary changes. Instead of lowering every graphics setting because one location performs badly, you can first determine whether the problem actually affects the whole game.
Build a Simple Performance Record
You do not need specialized testing software to create a useful record. A basic table can contain the location, test duration, average FPS, 1% low FPS, GPU usage, CPU usage, VRAM usage, and a short note about what happened.
For example:
| Test area | Average FPS | 1% low | GPU usage | Observation |
|---|---|---|---|---|
| Quiet interior | 96 | 78 | High | Smooth |
| Busy town | 68 | 49 | Lower | NPC-heavy |
| Open outdoor area | 82 | 64 | High | Stable |
| Combat scene | 74 | 38 | Variable | Effects cause spikes |
The numbers themselves are less important than the pattern. If the busy town repeatedly produces the lowest results while GPU utilization falls, that gives you a direction for further testing. If the outdoor area consistently pushes GPU utilization high, its behavior is different and should be treated accordingly.
Change One Variable After Establishing a Baseline
Once you have identified a problematic area, avoid changing five settings simultaneously. That makes it impossible to know which adjustment mattered.
Start with a baseline using the existing configuration. Then change one relevant setting and repeat the same route. For a GPU-limited scene, a graphics option such as shadows, resolution, or a demanding effects setting may be worth testing. For a CPU-limited scene, lowering graphical quality may produce little improvement, so other explanations deserve attention.
After each change, return to the same test location and compare the results. A meaningful improvement that repeats across several runs is much more convincing than a single better result.
Look for Patterns Across the Whole Game
The real value of area-by-area testing comes from comparing the results rather than focusing on one number. A game that averages 75 FPS overall could have excellent performance in most locations and severe problems in a few specific situations. That information is much more useful than simply describing the game as a “75 FPS game.”
Over time, these comparisons can also help identify changes caused by updates or drivers. If the same test route previously produced stable frame times but begins showing repeated spikes after a game update, you have a concrete before-and-after reference. Likewise, if a driver change improves one type of workload but makes another worse, testing several areas can reveal that trade-off.
The best performance investigation therefore treats the game as a collection of different workloads rather than one fixed benchmark. Where performance changes is often just as important as how much it changes. By testing repeatable locations, recording frame-time behavior, watching hardware utilization, and changing one variable at a time, you can turn an inconsistent gaming experience into something that is much easier to understand and troubleshoot.