
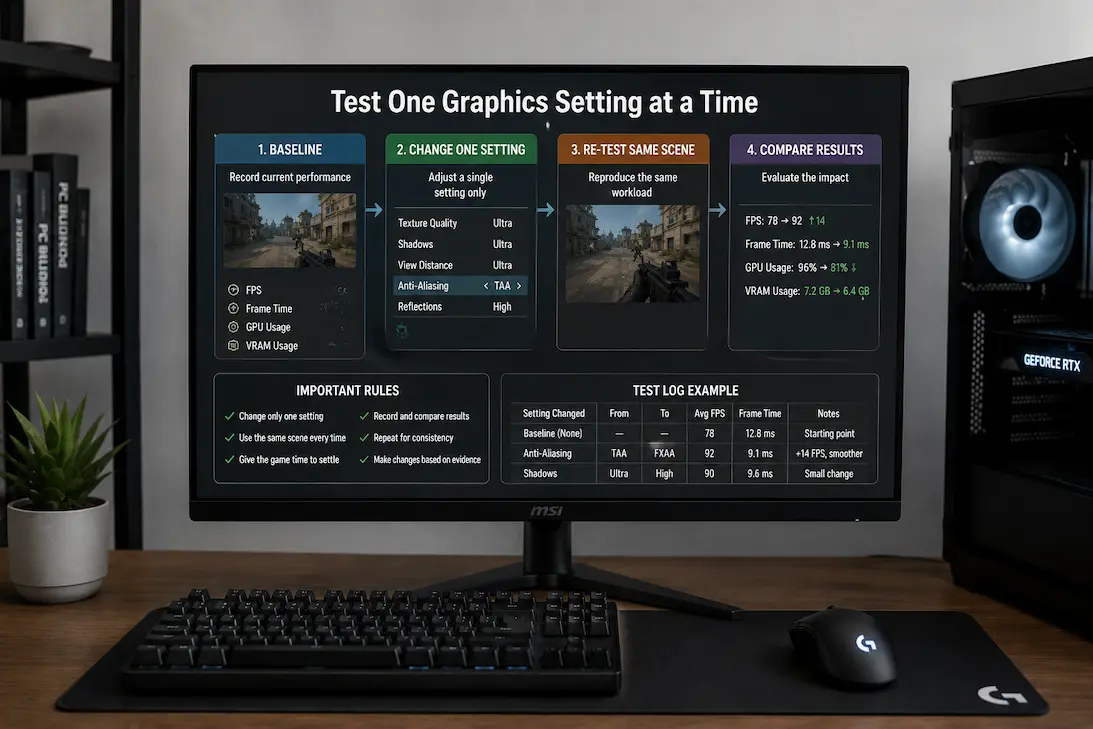
At first glance, improving game speed by adjusting graphics settings seems simple, but in reality, it becomes difficult to determine which setting is the deciding factor if too many settings are changed at once. Suppose a player lowers the resolution, disables raytracing, reduces texture quality, and changes graphics settings from “Ultra” to “Medium.” The game might then run more smoothly. However, this result does not show which adjustment is most important; it only shows that the system handles these combined calculations better.
This difference is crucial because you are aiming not only for the highest frame rate but also for the root cause of the performance issues. If low texture quality causes a memory problem, there is no reason to further reduce shadow quality or draw distance. Moreover, if lowering the resolution solves the GPU problem, simultaneously changing settings that consume many CPU resources reduces the validity of the test. Although control tests take more time, they do yield usable results. The basic idea is straightforward to understand: change one key variable, perform the same amount of work, observe the results, and then choose what you want to try next. This does not require laboratory tools or the exact same gameplay every time. You only need a sufficiently stable test environment to correlate performance changes with the settings you have modified.
Start With A Repeatable Baseline
Before making changes, you must understand how the game performs with the current settings. You must test where the problem consistently occurs, not in your current environment. Busy streets, challenging battles, repeatable benchmarks, or specific routes in open-world areas are good choices if the workload is the same.
Record key metrics before changing settings. While average frame rate (FPS) is useful, frame time, GPU usage, CPU activity, and VRAM usage provide additional information to help you analyze the problem. You do not need to record all available metrics. You must choose the right metrics based on the problem you want to solve. Suppose you are investigating VRAM stress. VRAM usage and frametime are more important than tracking all kinds of other irrelevant data. GPU usage and frametime are very useful if you want to understand whether a particular setting is consuming an excessive amount of GPU resources.
Keep the baseline simple.
A practical baseline might include:
| Measurement | Why record it |
|---|---|
| Average FPS | Shows overall performance |
| Frame time | Reveals consistency and spikes |
| GPU utilization | Indicates graphics workload |
| VRAM usage | Helps identify memory pressure |
| CPU utilization | Provides processor context |
| GPU temperature | Helps rule out thermal changes |
| GPU clock | Shows whether the card maintains expected performance |
You don’t need to obsess over tiny differences. The purpose of the baseline is to establish a reference point so that a meaningful change stands out from normal variation.
Change Only One Setting That Answers Your Question
The phrase “one setting at a time” doesn’t mean you should randomly change one option after another. The setting should be chosen because it tests a particular hypothesis.
If you suspect the GPU is struggling, changing resolution is a useful experiment because it directly alters the amount of rendering work. If you suspect VRAM pressure, texture quality is often more informative. If a game provides a crowd-density or simulation setting and performance collapses in populated areas, that setting may be worth testing for CPU-side workload. The objective is to make the smallest useful change. Changing five unrelated settings might produce a large FPS improvement, but it gives you very little information about why the improvement occurred.
A Useful Test Pair
Suppose the game runs at 52 FPS in a demanding scene. You lower texture quality one step, and the result becomes 53 FPS, with essentially identical frame-time behavior. That tells you texture quality probably isn’t responsible for the main performance limitation. If you instead lower resolution and performance rises from 52 to 70 FPS, you’ve learned something much more significant. The rendering workload was clearly affecting performance under those conditions. The test is valuable because the change itself was controlled.
Don’t Change The Preset While Testing Individual Settings
Graphics presets are convenient for quickly configuring a game, but they’re poor diagnostic tools because a preset can modify many settings simultaneously. Moving from Ultra to High might alter textures, shadows, reflections, lighting, effects, view distance, and several other options. If the game suddenly becomes smoother, you know the total workload decreased, but you don’t know which setting caused the original problem.
Once you’ve established a baseline, switch to custom settings and change individual options manually. This also makes it easier to restore your original configuration after each test. Keep a note of the original value so you don’t accidentally leave one setting reduced and then interpret the next experiment incorrectly.
Use the same scene for every comparison.
A graphics setting can appear to have a significant performance impact simply because the second test happened in a less demanding part of the game. Imagine testing Ultra in a crowded city and then lowering shadows while driving into an empty countryside area. If FPS rises by 30 frames, that doesn’t prove the shadow setting caused the improvement. The scene itself may simply have been easier to render.
The more repeatable the test environment, the more trustworthy the comparison becomes. Use the same route, camera direction, location, or benchmark sequence whenever practical. For open-world games, recording a short route can be particularly useful. Repeat the same movement at roughly the same speed and avoid interacting with unrelated objects between tests.
Give the game enough time to settle.
Some changes don’t produce their full effect immediately. A game may compile shaders, load new assets, rebuild caches, or perform background processing after a graphics setting changes. If you record performance during the first few seconds after changing an option, you may accidentally measure the transition rather than normal gameplay.
Run the same test sequence long enough for the game to reach a representative state. You don’t necessarily need a ten-minute benchmark for every setting, but a few seconds of movement through a complex scene may not be enough. The exact duration depends on the game. The important point is consistency: use approximately the same warm-up period for every comparison.
Separate Visual Quality From Performance Impact
Not every setting deserves to be treated as a performance setting. Some options can have a relatively small performance cost while producing a noticeable visual difference, while others may consume substantial GPU resources for an effect that is difficult to see during normal gameplay. This is where controlled testing becomes especially useful.
A setting should ideally be judged on two dimensions: how much performance it costs and how much visual quality it provides. A setting that costs 12 FPS but is barely noticeable may be a suitable candidate to reduce. Another that costs only 2 FPS while dramatically improving image quality may be worth keeping high.
The best configuration isn’t necessarily the one with every option at its lowest value. It is the one that gives you a sensible balance between performance and visual quality for your particular hardware.
Think In Terms Of Performance Cost
For each setting you test, note the approximate change:
| Setting change | FPS before | FPS after | Frame-time change | Visual difference |
|---|---|---|---|---|
| Example setting A | 60 | 58 | Small | Barely noticeable |
| Example setting B | 60 | 51 | Moderate | Clearly visible |
| Example setting C | 60 | 59 | Very small | Significant |
The exact numbers will vary by game. The useful part is the comparison between performance cost and visible benefit.
Test Resolution Separately From Graphics Quality
Resolution is an especially important variable because it can have a much larger effect on GPU rendering workload than many individual quality settings. If you’re trying to identify a GPU limitation, lowering resolution can be one of the clearest experiments. Keep everything else unchanged and compare the same demanding scene.
If the FPS increase is substantial, the GPU’s rendering workload is likely important. If the improvement is surprisingly small, the game may be limited elsewhere. Don’t permanently lower resolution just because you’re testing it. Restore the original value afterward if your goal is diagnosis rather than configuration.
Texture Quality Deserves Its Own Test
Texture quality should generally be tested independently because its relationship with VRAM differs from settings such as shadows or post-processing. A high texture setting can increase memory requirements without producing the same GPU-compute workload as increasing certain effects. If your symptoms involve texture pop-in, visual degradation, or stutters when entering new areas, texture quality becomes particularly relevant.
Lower it by one step, reproduce the same scene, and compare VRAM usage and frame time. If the memory footprint falls significantly but performance remains unchanged, VRAM probably wasn’t the main reason for the slowdown. If the stutters disappear along with the reduced memory pressure, you have stronger evidence that the setting was contributing to the problem.
Some Settings Affect More Than One Component
Graphics options aren’t always cleanly divided into “CPU settings” and “GPU settings.” A view-distance option, for example, can influence how much geometry the GPU renders while also increasing the amount of world information the CPU has to process. Ray tracing can increase GPU workload while also changing other parts of the rendering pipeline. Shadow distance can involve additional scene processing as well as rendering.
This is why labels such as “CPU-heavy” and “GPU-heavy” should be treated as useful tendencies rather than absolute classifications. When testing one of these settings, measure the result instead of assuming what it does based on its name.
Don’t Trust A Tiny FPS Difference
Performance naturally fluctuates. If one test produces 60 FPS and another produces 61 FPS, that doesn’t necessarily mean the second setting is faster. Background processes, asset streaming, player movement, and normal rendering variation can create small differences even when nothing has changed.
Search for changes large enough to rise above normal variation, preferably across multiple runs. If a setting appears to provide a one-frame improvement but produces no consistent change in frame time, it probably isn’t worth treating as a meaningful diagnostic result. The larger the performance difference and the more repeatable it is, the stronger the evidence becomes.
Repeating A Test Makes The Result More Trustworthy
One run can be affected by something unrelated to the setting you’re investigating. A background process might start, the game might load an asset differently, or your route through the scene might not be identical. If a result matters, repeat it.
You don’t need to run every test ten times. Two or three reasonably consistent runs can be enough to identify whether a change is substantial. If the results vary wildly between runs, that’s useful information too. It may indicate that the workload itself isn’t sufficiently controlled or that another source of variability is affecting performance. A setting that produces a consistent improvement across repeated tests deserves more confidence than one that looks impressive only once.
Keep A Small Test Record
When testing many settings, memory becomes surprisingly unreliable. After changing six options and running several benchmarks, it becomes easy to forget which configuration produced which result. A simple record avoids that problem.
You can keep something as basic as the following:
- Original configuration
- Setting changed
- Previous value
- New value
- FPS result
- Frame-time behavior
- VRAM result
- Visual difference
- Whether the test was repeated
This doesn’t need to become a complicated spreadsheet. The purpose is simply to prevent your troubleshooting process from turning into guesswork.
Change One Setting, But Don’t Ignore Related Conditions
Testing one setting at a time doesn’t mean every other condition has to remain perfectly frozen if something outside the game changes naturally. For example, shader compilation may happen during the first run and not the second. Windows may begin a background task. The game may stream different assets because you’ve taken a slightly different route.
When that happens, don’t pretend the result is perfectly controlled. Instead, recognize the source of uncertainty and repeat the test. Good diagnostics aren’t about creating laboratory-perfect conditions. They’re about reducing enough variables that you can make a reasonable connection between the change and the observed result.
When A Setting Appears To Do Nothing
Sometimes you lower a graphics setting dramatically, and performance barely changes. That isn’t a failed test. It tells you that the setting probably isn’t the main limitation under the conditions you tested.
For example, if reducing shadow quality from Ultra to Low changes FPS by only 2%, there’s little reason to spend time optimizing shadows for performance. You may instead want to test resolution, ray tracing, textures, or another workload that has a larger measurable effect. A setting that produces no meaningful change can therefore be just as informative as one that produces a large improvement.
Use The Results To Build A Better Configuration
Once you’ve tested several settings individually, you can combine the changes that actually make sense. Suppose lowering texture quality eliminates VRAM-related stutters, while lowering shadow quality produces almost no performance benefit and noticeably reduces image quality. You have evidence for keeping shadows high and textures one step lower.
Likewise, if lowering resolution produces a major performance improvement but you dislike the visual result, you might look for other GPU-heavy settings that can be reduced instead. The goal is not to blindly maximize FPS; it’s to find the most efficient compromise. This is where individual testing becomes much more useful than presets. You can build a configuration based on evidence from your hardware and the game you are actually playing.
A Practical Testing Order
If you’re investigating a general performance problem and don’t know which setting matters, use a logical sequence rather than changing options randomly. Start with resolution if you want to establish whether the GPU is heavily involved. Then investigate major rendering features such as ray tracing or other expensive effects if the game uses them. After that, test texture quality separately if VRAM is a concern, followed by shadows, reflections, view distance, and other settings relevant to the game’s workload.
This isn’t a universal order for every title. If your symptom is texture pop-in, for example, texture quality and VRAM should move higher on the list. If the problem appears only in crowded areas, CPU-related settings deserve earlier attention. The test order should follow the symptom you’re trying to explain, not an arbitrary graphics-settings checklist.
A Simple Decision Path
| Observation | Next useful test |
|---|---|
| Large FPS increase after lowering resolution | Investigate GPU-heavy settings |
| Almost no change after lowering resolution | Investigate CPU or engine limitations |
| VRAM drops and stuttering disappears after lowering textures | Investigate texture/memory pressure |
| One setting has almost no measurable effect | Leave it alone and test another |
| Performance varies greatly between runs | Improve test consistency |
| Visual quality falls heavily for a tiny FPS gain | Restore the setting |
This keeps the process focused instead of turning every available option into a separate troubleshooting project.
The best setting to lower is the one you can justify.
Graphics optimization becomes much simpler if you no longer assume that all settings are the same cause of poor performance. A game may have dozens of options, but only a few are likely to have a significant impact on the specific problem you are experiencing. First, create a repeatable benchmark, capturing enough information to understand how things are going, and then change one setting that makes sense. Repeat the same load and compare the results. If the change results in a significant and repeatable performance improvement, you have learned something useful. If there is almost no difference, you know that that setting might not be worth sacrificing for a performance gain.
This approach also prevents a common over-optimization: lowering settings that heavily affect image quality while ignoring real performance bottlenecks. Instead of causing blurry images or degraded image quality by simply lowering a preset, focus on the settings that truly affect system performance. Change one setting at a time, make a controlled adjustment, and then compare the results. This might sound slower than setting everything to ‘low,’ but it yields much more valuable information—precisely the information that game diagnostic tools provide, and not just a series of general optimization suggestions.
FAQs
1. Why can there be problems when changing multiple graphics settings at the same time?
This can make the results difficult to interpret. If performance improves after changing five settings, you cannot determine which setting is responsible. By testing each setting individually, you can find the setting that really works.
2. How long should each graphics setting be tested?
There is no fixed test duration. Use repeatable game segments and give the game sufficient time to stabilize after changing the settings. Consistency in testing is more important than randomly choosing a minute.
3. Should I test the resolution before testing other settings?
The resolution is a useful first test to determine if the GPU is a performance bottleneck, as the setting significantly affects the rendering load. However, the best starting point depends on the problem you are investigating.
4. What if changing a setting has almost no effect?
This approach is useful. It indicates that the setting does not pose a major performance impediment under these circumstances. Therefore, revert to that setting and investigate other variables instead of lowering it unnecessarily.
5. Should I repeat every graphics test?
Repeated testing is useful for drawing important conclusions. Small performance differences occur naturally, so a result that occurs only once should not automatically be considered significant.
6. Should I use graphics presets instead of individual settings?
Presets are useful for quickly getting a general overview of performance levels, but individual settings are better suited for diagnosing problems. They can help identify specific options that cause performance changes.